


Getting professional neck labels printed for your garments is straightforward once you know which label type fits your product and how to prepare your files. The fastest path for most small brands: choose between woven, printed satin, or heat-transfer labels based on comfort and durability needs, prep a vector file, and request a digital proof plus a physical sample before committing to a full run. Tektonla handles all three label types with US-based production, low minimum quantities, and a clear proof-to-production workflow.
Quick action checklist:
- Choose your label type (woven, printed fabric, or heat-transfer)
- Pick a standard size that fits your collar seam
- Prepare your file in PDF or vector format (AI, EPS)
- Request a digital proof from your printer
- Order a sewn or printed physical sample
- Place your production run once the sample is approved
Pro Tip: Before you contact any printer, measure your collar seam and decide whether the label sits inside the neck (replacing the tear-away tag) or outside below the collar. That single decision determines your size, fold style, and required label content.
Key Takeaways
Choosing the right neck label type and preparing a production-ready file are the two decisions that most directly determine whether your labels look professional and hold up after washing.
| Point | Details |
|---|---|
| Match label type to garment | Woven for premium, heat-transfer for athletic or kids’, printed satin for full-color seasonal designs. |
| Size to the collar seam | Inside labels typically run 1" wide; outside decorative labels up to 3"×3". |
| Submit vector files | Use PDF, EPS, or AI with outlined fonts and CMYK or PMS color calls depending on method. |
| Always sample before full run | Request a digital proof and a physical sewn or printed sample; run a wash test before approving. |
| Tektonla for US production | Tektonla offers woven labels, printed neck tags, and heat-transfer prints with domestic turnaround and low MOQs. |
Table of Contents
- What types of neck label printing work best for your brand?
- What size should your neck label be, and where does it go?
- How to prepare artwork files for neck label printing
- How ordering works: MOQs, pricing, and turnaround
- Attachment methods and finishing options
- How to evaluate and choose a neck label supplier
- What Tektonla offers for neck labels and how the workflow runs
- What the Tektonla team sees brands get wrong
- Tektonla’s neck label services: where to start
- Helpful sources and templates
What types of neck label printing work best for your brand?
Neck labels fall into four main categories, and each one serves a different brand position, budget, and garment type.
Woven labels use thread instead of ink, woven on a loom to create a textured, dimensional finish. They’re the standard for premium and heritage brands because they hold up through hundreds of wash cycles without fading. The tradeoff: color count is limited by thread selection (typically 8–15 colors per label), and very fine details like thin serifs or hairline rules don’t reproduce cleanly at small sizes.
Printed fabric labels (usually satin or nylon) use inkjet or screen printing to lay full-color graphics directly onto a fabric substrate. They cost less per unit than woven, support photographic detail and gradients, and work well for brands that rotate seasonal colorways. Durability is solid for normal wash cycles, though printed labels on satin can show edge fraying over time without a heat-cut finish.
Heat-transfer and DTF neck prints apply directly to the inside of the garment, creating a tagless finish. No sewn label, no scratchy edge, no seam bulk. Athletic brands and children’s wear manufacturers favor this method because it eliminates the main source of wearer irritation. The limitation is tactile depth: you get a flat, smooth print rather than a raised woven texture, and the design area is constrained by the garment’s collar shape.
Iron-on transfers sit between heat-transfer prints and sewn labels. They’re useful for small runs or sample testing, but adhesion longevity depends heavily on fabric type and press temperature consistency.
| Label Type | Best For | Color Range | Wash Durability | Relative Cost |
|---|---|---|---|---|
| Woven | Premium, heritage brands | 8–15 thread colors | Excellent | Higher |
| Printed satin/nylon | Full-color, seasonal brands | Full color | Good | Moderate |
| Heat-transfer/DTF | Athletic, kids’, tagless tees | Full color | Good to excellent | Low to moderate |
| Iron-on transfer | Samples, small test runs | Full color | Fair | Low |
Pro Tip: For children’s wear, skip the woven label entirely and go heat-transfer. Parents notice scratchy tags immediately, and a tagless finish on a kids’ garment signals quality before the child even puts it on. For eco-conscious brands, pair your label choice with sustainable fabric options to keep the whole product aligned.
What size should your neck label be, and where does it go?
Size and placement are where most first-time label orders go wrong. A label that’s too wide buckles at the collar seam; one that’s too tall crowds the neckline and irritates the wearer.
Common size ranges by label type:
- Woven size tags (inside neck): small tall and medium wide, typically sized to fit most collars
- Brand neck labels (inside, replacing tear-away): a range of widths and heights suitable for brand display inside collars
- Outside neck labels (below collar, decorative): generally up to several inches square, sized for readability and collar fit
- Center-fold woven labels: the finished visible face is approximately half the total label height
Placement rules matter for both aesthetics and compliance. An inside neck label replaces the manufacturer’s tear-away tag and must include legally required information: country of origin, fiber content, care instructions, and size. An outside label below the collar is purely decorative or brand-facing and carries no mandatory content, but it needs to be sized so it doesn’t extend past the collar edge when the garment is worn.
Always request a vendor-specific template. Good printers supply a vector outline that shows the safe area, stitch lines, and fold allowance. If you’re working without a template, add at least 0.125" of bleed on all sides and keep critical text and logos inside a safe area 0.125" from any edge.
Pro Tip: Request a center-fold mock from your printer before approving the final size. A label that looks proportional flat on screen can look undersized or oversized once folded and sewn into a collar. The mock takes minutes and saves a full sample round.
How to prepare artwork files for neck label printing
File quality is the single biggest variable in whether your label reproduces cleanly. Printers can’t fix a low-resolution logo or an unoutlined font once the job is in production.
Core file rules:
- Use vector formats (PDF, EPS, or AI) for logos and text. Vectors scale without quality loss, which matters at the small sizes neck labels require.
- For any raster image elements, supply files at 300 DPI at the final print size, not at screen resolution.
- Outline all fonts before saving. If a printer doesn’t have your typeface installed, outlined text prevents substitution errors.
- Mark fold lines and stitch lines clearly on a separate layer or as a non-printing guide.
Color mode: Supply CMYK files for printed satin and heat-transfer labels. For woven labels, provide a Pantone (PMS) color call sheet alongside your artwork so the thread colors can be matched as closely as possible. Thread can’t reproduce every PMS color exactly, so ask your printer for a thread color chart before finalizing your design.
Tektonla’s print file best practices guide walks through recommended formats, resolution requirements, and proofing steps in detail. Use it as your pre-submission checklist.
A consistent file naming convention saves time when revisions come back: BRAND_necklabel_v1_print.pdf tells the production team exactly what they’re looking at without a phone call.
How ordering works: MOQs, pricing, and turnaround
Minimum order quantities vary by label type, and understanding why helps you plan your budget.
Woven labels involve loom setup costs. Threading a loom for a custom design takes time and materials, so most woven label runs carry a setup fee and a practical minimum, even when a printer advertises low MOQs. Printed satin and heat-transfer labels have lower setup overhead, which is why many printers offer on-demand or small-batch runs for those methods.
Main pricing drivers:
- Color count (more thread colors or ink layers = higher cost per unit)
- Quantity (per-unit cost drops significantly at higher volumes)
- Finishing (folded labels cost more than flat; laser-cut edges cost more than heat-cut)
- Material (damask weave costs more than taffeta; satin costs more than nylon)
- Physical samples and rush production both add to the total
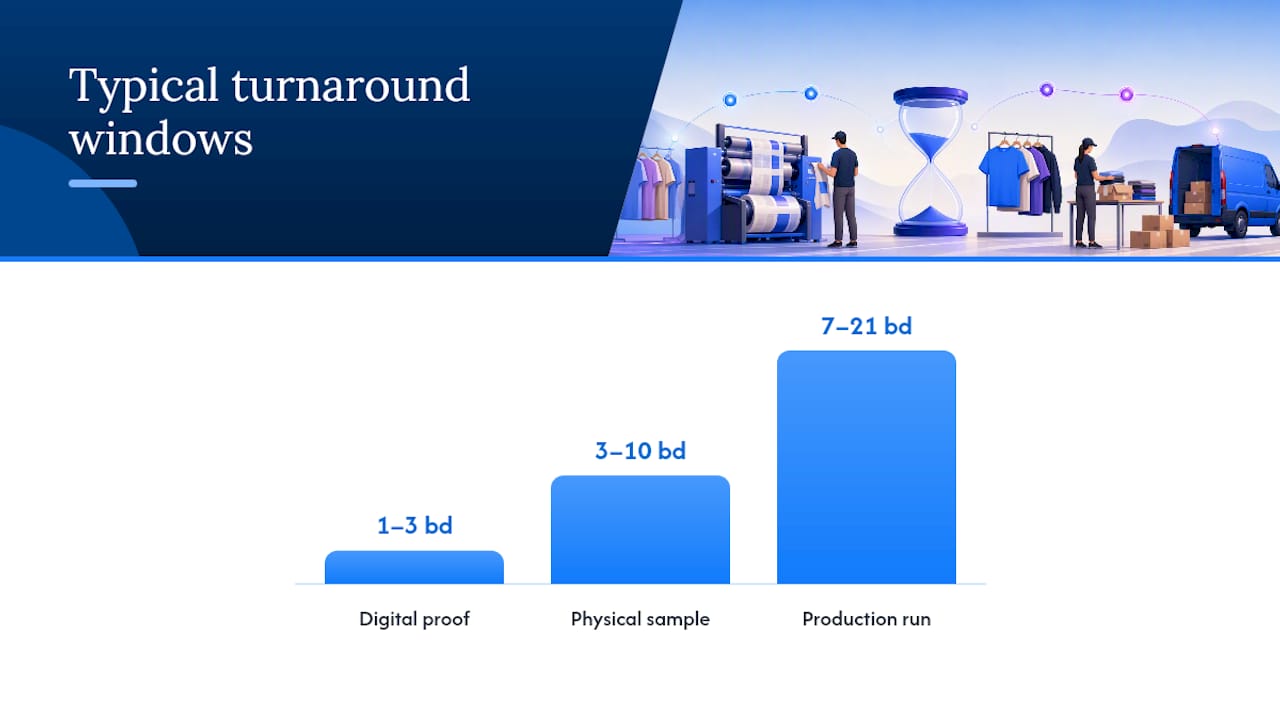
Typical turnaround windows:
- Digital proof: 1–3 business days
- Physical sample: 3–10 business days depending on method
- Production run: 7–21 business days
- Expedited production: available from most US printers for an added fee
Before placing any order, confirm that your printer can provide a digital proof, a physical sewn or printed sample, and clear turnaround windows in writing. US-based production matters if you’re working toward a seasonal drop with a hard ship date.
Attachment methods and finishing options
How a label attaches to the garment affects wearer comfort, production cost, and how long the label holds up.
Sewn-in labels are the most durable option. A single-layer label is sewn flat into the collar seam; a center-fold label is folded in half and sewn at the fold, leaving both faces visible. End-fold labels fold both short ends under before sewing, giving a cleaner edge on the inside of the garment.
Heat-seal and iron-on labels skip the sewing step entirely. Heat-seal transfers bond directly to the fabric under pressure and temperature. They work well on smooth, tight-weave fabrics but can peel on heavily textured or stretch-heavy substrates. Always confirm fabric compatibility before ordering a heat-seal run.
Tagless neck prints (DTG or DTF applied directly inside the collar) eliminate the label altogether. No attachment point, no edge, no seam bulk. For performance apparel and youth garments, this is often the right call.
On the finishing side, laser-cut edges are cleaner and more precise than heat-cut, and they reduce fraying on satin labels. Soft-finish woven labels use a lower thread density to create a softer hand-feel, which matters for garments worn against bare skin.
Pro Tip: Always request a sewn sample that shows stitch placement. A label sewn too close to the fold line can cause fabric puckering; one sewn too far from the edge can curl away from the garment after washing. A spec sheet with recommended seam allowance prevents both problems.
How to evaluate and choose a neck label supplier
Not every printer who offers neck labels delivers the same quality or service. A short vetting process before you place an order saves significant rework.
Questions to ask every supplier:
- Can you provide a digital proof and a physical sewn or printed sample before the full run?
- What are your MOQs by label type, and do you charge a separate setup fee?
- What file formats do you accept, and do you have templates with safe areas and fold lines?
- Are thread colors matched to Pantone, and can I see a thread color chart?
- What are your standard and rush turnaround times, and do you ship domestically from the US?
Quality checks to request:
- A wash/durability test on the physical sample (run it through three wash cycles before approving)
- Colorfastness confirmation for heat-transfer labels on the specific fabric you’re using
- Thread count and weave density specs for woven labels
Red flags: no sample or proof policy, vague turnaround estimates (“2–4 weeks, depending”), inability to confirm fabric compatibility for heat-seal labels, and no published file-prep guidance. A printer who can’t tell you what DPI they need or what color mode to submit in is not set up to handle production-quality artwork.
Pro Tip: Ask for the printer’s wash-test protocol in writing. A supplier confident in their product will tell you exactly how their labels perform after repeated washing. One who deflects that question is telling you something important.
What Tektonla offers for neck labels and how the workflow runs
Tektonla is a Downtown Los Angeles-based custom apparel and branding studio offering DTG, DTF, screen printing, embroidery, and custom woven labels in multiple fold and finish configurations. For neck labels specifically, the service list covers private label woven labels, printed neck tags, heat-transfer neck prints, and sample runs, with no-minimum blanks available for testing label placement and fit before committing to a production order.
The workflow for a brand ordering neck labels runs like this:
- Submit your spec (label type, size, fold style, material preference, and collar measurements)
- Upload your artwork file (vector PDF preferred)
- Receive a digital proof for approval
- Approve or revise, then request a physical sample
- Approve the sample and place the production run
- Domestic US shipping from Los Angeles
Tektonla also publishes a garment printing techniques guide that covers when to use DTG vs. DTF vs. screen printing, which pairs well with label-type decisions for brands building out a full production spec.
What the Tektonla team sees brands get wrong
The most common mistake we see from first-time label orders: choosing a label type based on cost alone, without testing it on the actual garment. A heat-transfer label that looks great on a tight-weave cotton tee can peel within a few washes on a French terry or a stretch-heavy performance fabric. The sample step isn’t optional; it’s where you catch that problem before it affects your whole run.
The second mistake is skipping the woven option because it seems expensive. For a brand positioning above the $40 retail price point, a woven label is one of the highest-return investments you can make. Customers feel it before they read it. A soft-finish woven label on a premium tee communicates quality in a way that a printed satin label simply doesn’t, regardless of how good the design is.
For seasonal drops, plan your label lead time separately from your garment lead time. Labels often take longer than brands expect, especially if a physical sample round is needed. Build in at least two weeks for the sample-and-approval cycle before your production run starts.
Tektonla’s neck label services: where to start
Tektonla gives apparel brands a single production partner for the full label stack: woven labels, printed neck tags, and heat-transfer neck prints, all produced domestically in Los Angeles with digital proofing and physical sample options built into the workflow.

For brands ordering woven labels, the custom woven labels product page shows available fold styles, finish options, and the process for requesting a proof. For brands testing label placement on blanks before a full production run, the Printers Shirt is a practical starting point. To get a quote or start an order, visit Tektonla and submit your spec directly.
Helpful sources and templates
- Tektonla print file best practices: file format, resolution, and proofing checklist for garment and label artwork
- Tektonla garment printing techniques guide: method-level detail on DTG, DTF, and screen printing to complement label decisions
- Step-by-step custom neck label guide: industry how-to covering cutting, artwork, printing, and heat-press application
Request vendor templates and a sewn or printed sample from your printer before placing any full production run. Templates with safe areas and fold lines are the fastest way to avoid a costly revision cycle.