


3D puff embroidery uses an embroidery-specific foam underlay beneath tight satin stitches to lift a design off the surface, creating a raised, sculpted logo. It works best on bold, simple shapes stitched onto structured cap panels, not fine text or detailed artwork. Pulling it off cleanly takes the right foam, polyester thread, a properly digitized file, and stitch settings dialed in for perforating foam instead of fabric.
TL;DR:
- Using the correct embroidery-specific foam and polyester thread ensures clean perforation, enabling smooth execution and avoiding shredded foam issues.
- Digitizing for puff requires tight satin stitches with no underlay and inserting stop commands after outlines to correctly place the foam material.
- Proper hooping and reduced stitching speed are essential for achieving even, high-quality puff on caps without tearing or misalignment.
- Stacking multiple foam layers compromises puff quality by causing shifting and uneven surfaces, so a single dense 3 to 4mm sheet is preferred.
- Extra time and costs include slower stitch speeds, additional digitizing steps, foam material, and meticulous cleanup, making puff a premium embroidery option.
Table of Contents
- What Is 3D Puff Embroidery, and How Does It Differ From Flat Embroidery?
- What Materials and Tools Does 3D Puff Embroidery Require?
- How Do You Digitize a Design for 3D Puff Embroidery?
- How Do You Stitch 3D Puff Embroidery on a Cap?
- Why Is My 3D Puff Embroidery Coming Out Wrong?
- How Do You Clean Up and Finish 3D Puff Embroidery?
- How Much Extra Time and Cost Does 3D Puff Add?
- How Tekton LA Approaches 3D Puff Embroidery for Clients
- Ready to Put a 3D Puff Logo on Your Next Hat Run?
- Sources
- FAQ
What Is 3D Puff Embroidery, and How Does It Differ From Flat Embroidery?
Flat embroidery lays stitches directly on fabric. 3D puff embroidery adds a layer of foam between the fabric and the thread, then stitches a dense satin pass over it. The needle perforates the foam as it stitches, and the satin thread wraps around what’s left, creating height instead of a flat surface.
That height is the whole selling point. A flat-stitched logo reads as print; a puffed one reads as a raised patch, which is why so many trucker caps and letterman-style jackets lean on it for brand marks. Bags and structured panels on jackets work too, as long as the panel underneath is stable enough to support the foam.
Where puff falls apart is fine detail. Thin lines, small text, and intricate line art collapse into a lumpy mess once foam gets involved. Save puff for bold letters, thick outlines, and simple mascot shapes. Keep the fine print flat.
What Materials and Tools Does 3D Puff Embroidery Require?
Sourcing the right supplies prevents most of the headaches beginners run into. Embroidery-specific foam, not craft store foam, is the foundation of the whole technique.
- Foam thickness: 2 to 4mm embroidery-specific foam, such as Madeira’s E-Zee 3D foam, which comes in multiple colors and a denser “Bodybuilder” version for taller puff.
- Why not craft foam: Craft store foam sheets are inconsistent in density and shred under the needle instead of perforating cleanly.
- Thread: 100% polyester, chosen for tensile strength and heat tolerance during any later cleanup step.
- Needles: 75/11 sharp needles are the standard recommendation for most cap puff work, per Wilcom’s webinar guidance; size up slightly for denser foam.
- Stabilizer: medium to heavy cutaway for structured caps, since caps take more stitch density and stress than a flat shirt panel.
- Adhesives: double-sided tape or foam adhesive to hold the foam in place before tack-down stitches secure it.
Machines running puff jobs also need a proper cap frame and a driver willing to slow down. Running full speed on a puff pass is the fastest way to break thread.
How Do You Digitize a Design for 3D Puff Embroidery?
Digitizing for puff is different from digitizing for flat stitching, and getting it wrong is the number one reason first attempts look sloppy. Puff areas need satin fill only, with no underlay at all. Underlay adds bulk under foam that’s already thick enough, and it makes the perforation uneven.
Stitch spacing has to tighten up considerably. The standard for puff work is typically set to a tight spacing to ensure the needle punches through the foam densely enough to hold its shape once excess foam gets torn away, as detailed in Hatch Embroidery’s digitizing guide.
A few more rules matter just as much as spacing:
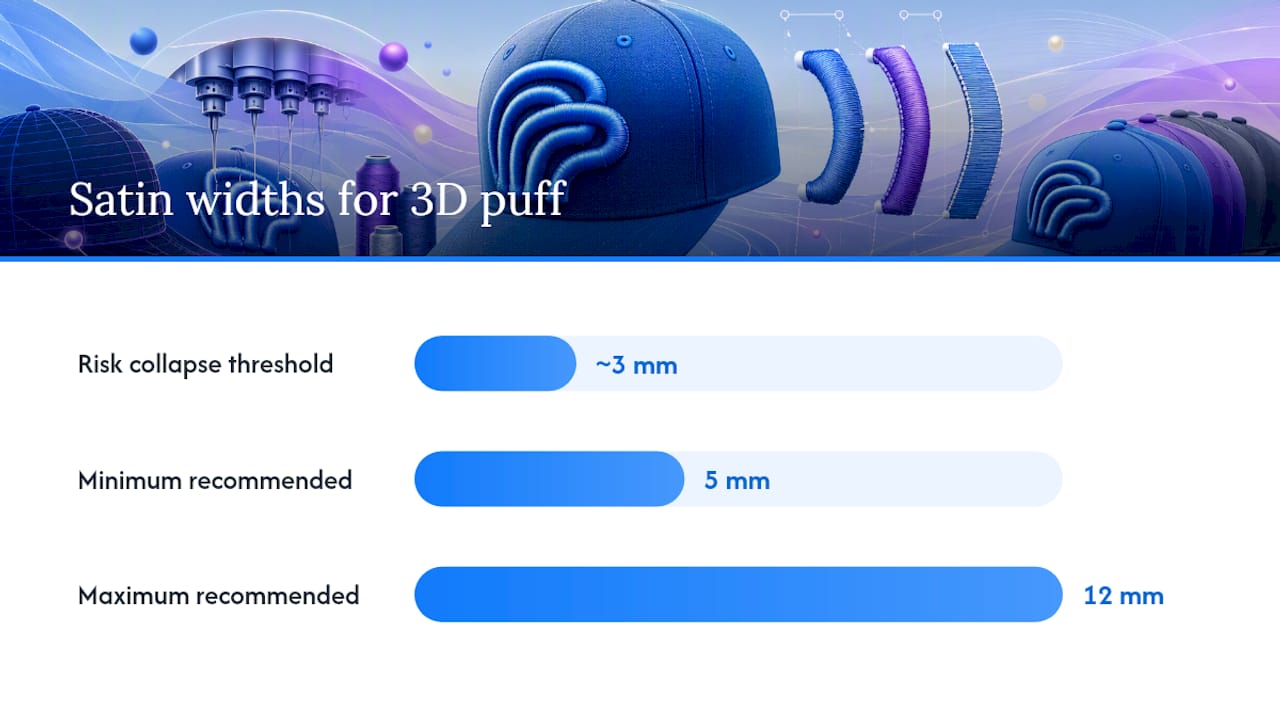
- Keep satin widths and line thickness between roughly 5 and 12 mm for the cleanest results; anything under about 3 mm risks collapsing once the foam is trimmed.
- Insert a stop command right after the outline or contour stitch so the machine pauses and you can place the foam before the puff pass begins.
- Use capping at letter ends and sharp corners so foam doesn’t peek out past the stitch edge, a technique detailed in Tajima’s technical tips.
- Design bold elements for the puff layer and leave any fine text or detail as flat stitching in the same file.
Get these settings wrong and you’ll know immediately: the foam either won’t perforate cleanly or it’ll shred at the edges during trimming.
How Do You Stitch 3D Puff Embroidery on a Cap?
Caps are the most common home for 3D puff, and the workflow below is roughly what production shops follow whether they’re running a single-head hobby machine or a multi-head commercial rig.
- Hoop the cap properly. Seat it on a dedicated cap frame, not a flat hoop, and secure the sweatband and sides so the panel doesn’t shift under tension.
- Stitch the outline and stop. Run the design in semi-automatic mode so it halts right after the contour stitch, which is your cue to place the foam.
- Cut and place the foam. Trim a piece slightly larger than the design, leaving about an inch of margin, and set it over the stitched outline.
- Tack it down. Hold the foam with double-sided tape or clips until the tack-down stitches engage and lock it in place, a method Ricoma’s cap guide walks through in detail.
- Run the puff pass at reduced speed. Test somewhere between 500 and 750 stitches per minute depending on your machine, then trim away the excess foam once stitching finishes.
Always run one sample cap before committing to a production batch, and match your foam color to the thread so any tiny remnant left behind blends in rather than standing out.
Why Is My 3D Puff Embroidery Coming Out Wrong?
Most puff problems trace back to one of four causes: tension, speed, needle choice, or foam that’s stacked instead of single-layer.
Top-thread tension that’s too tight compresses or slices through the foam as the needle passes, leaving a flattened, uneven surface. Loosen it slightly compared to your normal flat-stitch setting. Machine speed matters just as much. Running fast increases needle deflection through dense foam, which snaps thread and misaligns stitches, so slowing down is not optional on a puff pass.
Stacking two thinner foam layers to save money on 4mm stock is tempting, but experienced embroiderers warn against it because the layers shift independently under the needle, causing thread breaks and a lumpy, uneven puff, according to a practitioner guide on puff troubleshooting. One dense 3 to 4mm sheet outperforms two stacked thin ones every time.
- Loosen top tension slightly before stitching over foam.
- Use needles sized around 75/11, adjusting for foam density, and reduce speed to prevent thread breaks and deflection.
- Avoid stacking foam layers, as a single dense sheet yields better results.
- Pull remaining foam bits free with tweezers rather than forcing them.
Pro Tip: Run a short test swatch at your final speed and stitch settings before touching the production batch. A five-minute sample catches tension and spacing problems that would otherwise ruin a dozen caps.
How Do You Clean Up and Finish 3D Puff Embroidery?
Cleanup is where a lot of otherwise good puff work gets damaged, usually from impatience with the heat gun. Manual cleanup with tweezers and small, sharp scissors handles most stray foam, especially in tight corners where letters meet.
For the tiny bits that resist tweezers, a hair dryer or heat gun on its lowest setting can shrink leftover foam fragments, but polyester thread melts under too much heat, so always test on scrap fabric first and keep the tool moving, a caution echoed in Gunold’s cleanup guide.
- Check the finished piece for snagged threads or trapped foam before calling it done.
- If the garment needs pressing afterward, avoid direct heat on the puff area entirely or use a protective cover cloth.
How Much Extra Time and Cost Does 3D Puff Add?
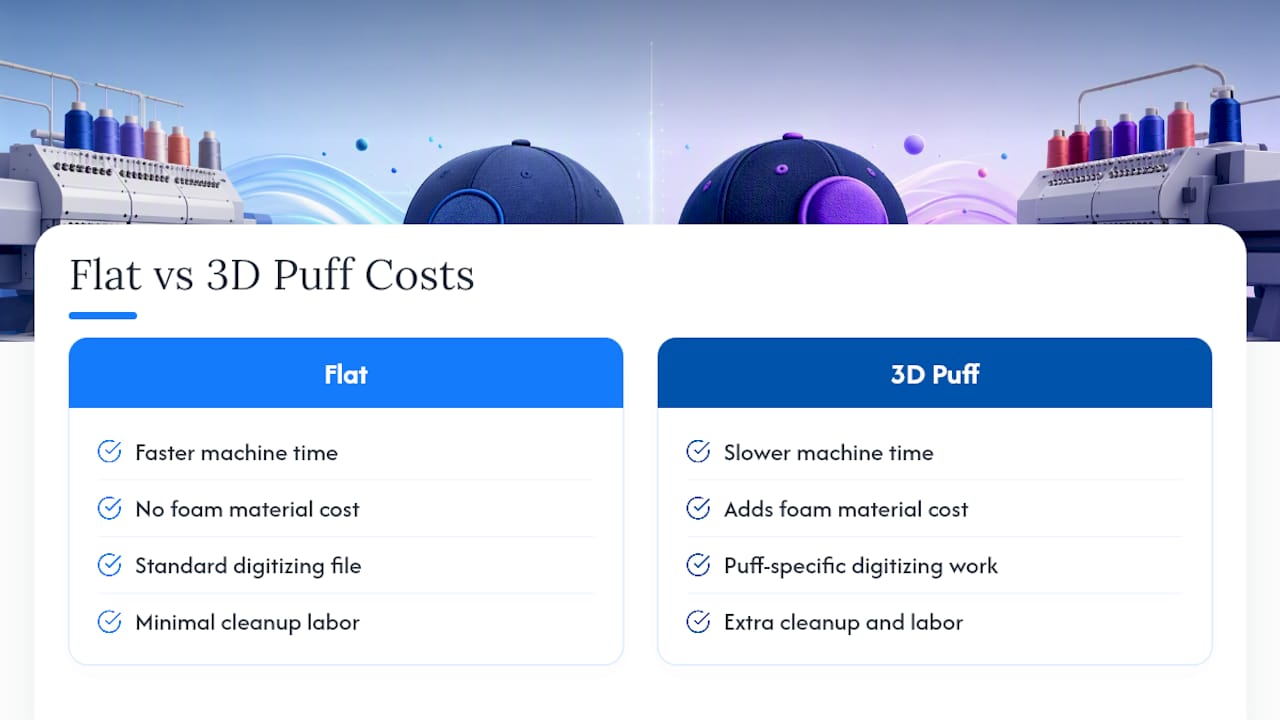
Puff takes longer than flat embroidery, full stop. Between foam placement, the slower stitch pass, and cleanup afterward, expect meaningfully more time per hat than a comparable flat logo. This is before you factor in a bad run that needs redoing.
Price the upgrade to reflect that. Build in the cost of the foam itself, the extra digitizing work for a puff-specific file, the slower machine time, and the cleanup labor. Most shops treat 3D puff as a premium upgrade tier rather than baking it into a flat per-hat rate, which keeps pricing honest for customers who just want a standard flat logo. If you’re weighing puff embroidery against other decoration methods for the same hat run, it’s worth comparing costs against patch options before committing to digitizing fees.
For small runs or one-off samples, outsourcing to a shop that already owns the foam, the frames, and the digitizing experience is often cheaper than buying equipment you’ll use twice a year.
How Tekton LA Approaches 3D Puff Embroidery for Clients
Puff earns its place when a logo is bold enough to survive the foam and the brand wants a hat that feels premium off the shelf, not printed. For anything text-heavy or fine-lined, flat embroidery still wins on legibility.
Sampling first is non-negotiable. A vector logo and a test cap catch spacing and color problems before a production run does. Good art prep upfront, paired with a production partner who already knows the foam and machine settings, saves more money than any discount on the per-unit rate.
— Christian
Ready to Put a 3D Puff Logo on Your Next Hat Run?
An embroidery production shop runs custom embroidery with no minimum order quantities on blanks, so a five-cap sample run costs the same attention as a five-hundred-unit order. That matters if you’re testing a puff logo before committing to a full production batch.

Before requesting a quote, have a vector version of your logo ready, pick a hat style (a structured foam trucker cap or a blank snapback both work well for puff), and decide roughly how tall you want the foam and what color it should match. The shop also handles private label details like woven labels if the caps are heading to retail. Send over your logo and quantity, and request a sample run through the Tekton LA site to see the puff height and color match before you commit to a full order.
Sources
- How to Digitize for 3D Puffy Foam Machine Embroidery
- Tips for Beautiful 3D Puff Embroidery on Caps | TAJIMAG
- How to do 3D Puff Embroidery on Caps
- E-Zee 3D Embroidery Foam Topping
- Q&A from 3D Puff Embroidery Webinar
FAQ
What Is 3D Puff Embroidery?
It’s an embroidery technique that places embroidery-specific foam under satin stitches so the needle perforates the foam and creates a raised, three-dimensional logo instead of a flat one.
Can I Get a Custom 3D Puff Hat Embroidered?
Yes. Tekton LA produces custom embroidered caps including 3D puff logos with no minimum order quantity, so a single sample cap or a full production run both work.
How Do I Digitize for 3D Puff Embroidery?
Use satin fill with no underlay, tighten stitch spacing to roughly 0.16 mm, keep satin widths between about 5 and 12 mm, and insert a stop after the outline stitch so foam can be placed before the puff pass.
What’s the Difference Between Regular Embroidery and 3D Puff Embroidery?
Regular flat embroidery stitches directly onto fabric, while 3D puff embroidery stitches over a foam layer to lift the design and add visible height and dimension.