You spent weeks perfecting a design, paid for a sample run, and then the shirts arrived looking nothing like what you imagined. The colors were off, the placement was wrong, and now you’re out money and time. This is one of the most common and costly mistakes clothing brand owners make. Apparel mockups solve this problem before it starts. In this guide, you’ll learn the exact tools, workflow, and best practices to create accurate, professional mockups that show you exactly what your finished product will look like before a single garment is printed.
Table of Contents
- What you need to mock up custom apparel designs
- Step-by-step: How to create a custom apparel mockup
- Make your apparel mockups look real: Best practices
- Scaling up: Batch mockups and automation for multiple designs
- Troubleshooting apparel mockup issues
- Our hard-won lessons: What actually makes apparel mockups sell
- Ready to launch your custom apparel designs?
- Frequently asked questions
Key Takeaways
| Point | Details |
|---|---|
| Use high-res templates | Starting with quality templates and artwork ensures your mockups look professional and accurate. |
| Preview multiple placements | Check your designs on front, back, sleeves, and labels for a complete and error-free mockup. |
| Match textures and lighting | Adding realistic fabric effects and lighting makes your apparel visuals more convincing to buyers. |
| Scale efficiently with automation | Batch tools and smart templates help you manage large product lines without repetitive work. |
What you need to mock up custom apparel designs
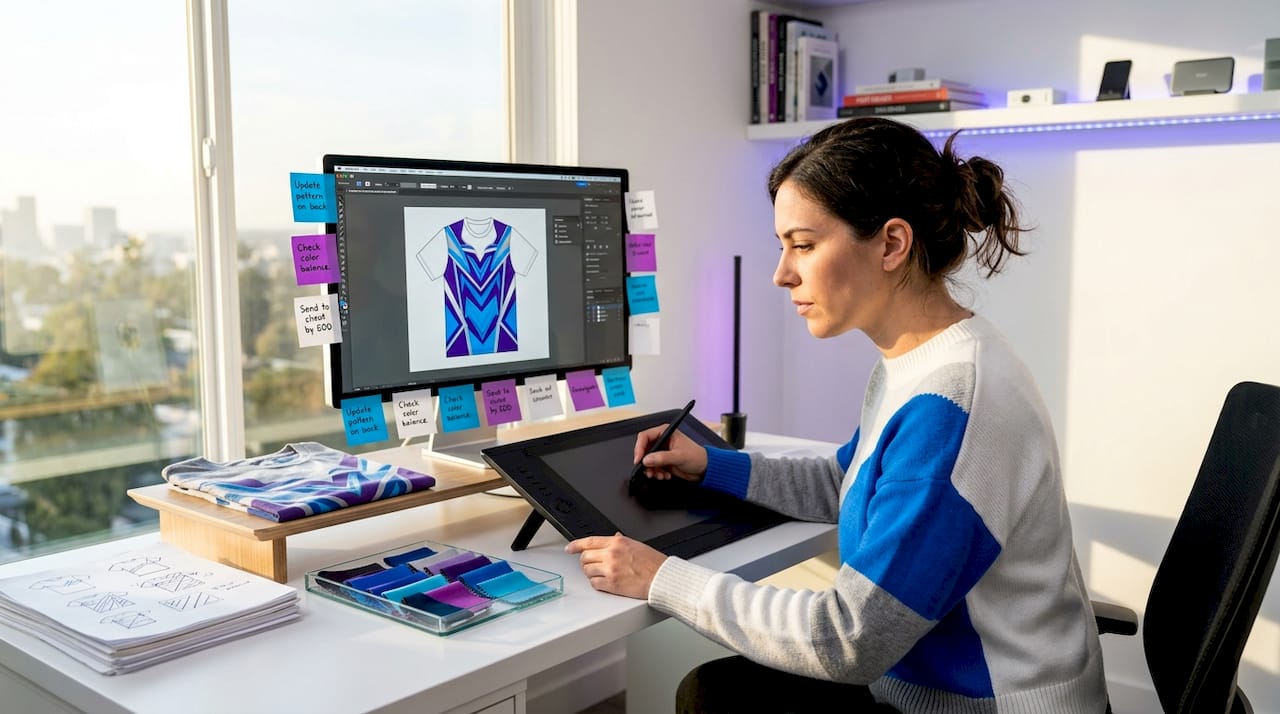
Once you understand why mockups matter, you’ll want to gather everything you need before jumping into the process. Think of this stage like mise en place in cooking. Having everything in order before you start saves you from scrambling mid-workflow and making sloppy decisions.
Here’s what you need to get started:
- Apparel mockup templates: These are pre-built PSD or layered files shaped like garments. Many are free; premium options offer more realistic fabric textures and lighting.
- Editing software: Adobe Photoshop is the industry standard, but free tools like Photopea, Canva, or Placeit work well for beginners.
- High-resolution artwork: Your design file should be at least 300 DPI for print. Lower resolution files will look blurry on the final mockup and in production.
- PNG files with transparency: PNG is the preferred format because it preserves transparent backgrounds, so your design sits cleanly on the garment without a white box around it.
- Basic file management skills: You need to know how to resize, export, and name files consistently.
| Asset | Recommended spec | Why it matters |
|---|---|---|
| Artwork resolution | 300 DPI minimum | Prevents blurry mockups and print errors |
| File format | PNG (with transparency) | Clean placement on garment templates |
| Color mode | RGB for web, CMYK for print | Ensures accurate color rendering |
| Template type | Layered PSD or smart object | Allows non-destructive editing |
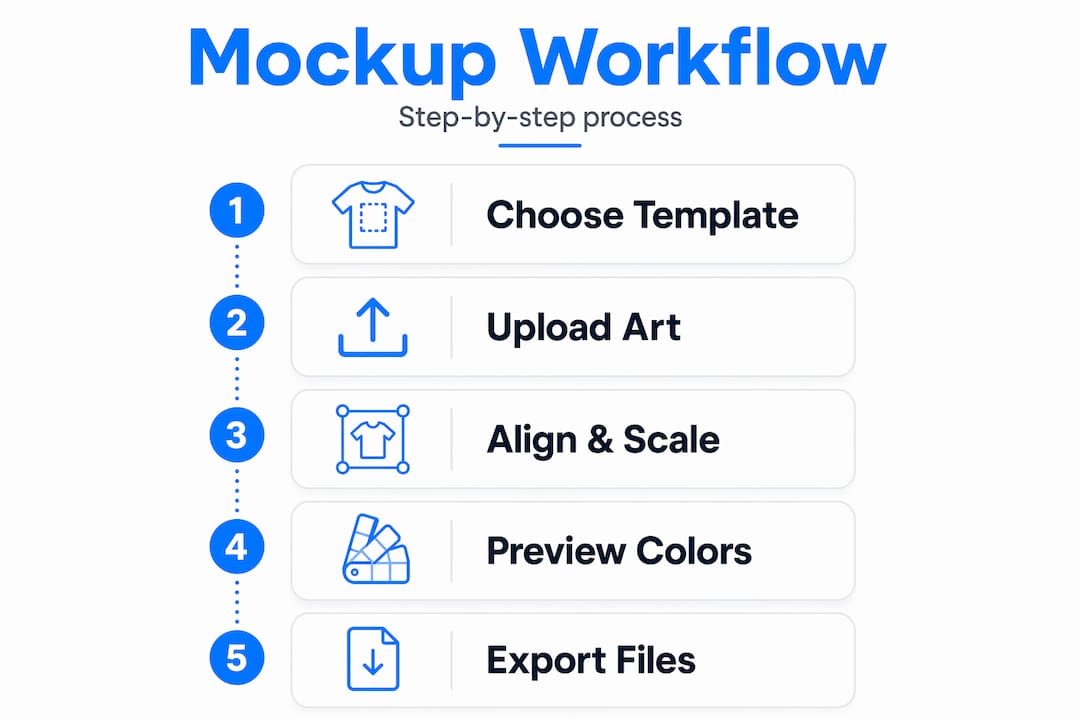
A practical mockup workflow starts with a clothing template, then uploading your artwork as a PNG or JPG, aligning and scaling it on the garment, and finally previewing and downloading the result for use in listings and marketing.
Pro Tip: Create a dedicated folder structure for each product line. Label subfolders by colorway, placement, and garment style. This makes batch updates and future revisions much faster, especially when you’re managing 10 or more SKUs.
For specific garment types, check out Major T-shirt mockup tips and the Classic Tee mockup guide to see how template selection varies by cut and style.
Step-by-step: How to create a custom apparel mockup
With your tools and files ready, you’re set to walk through the actual creation process. This workflow applies whether you’re using Photoshop or an online editor.
- Choose your garment template: Select a template that matches the actual garment you plan to produce. A boxy tee template won’t accurately represent a fitted crop top. Match the cut, gender, and style as closely as possible.
- Open the template and locate the smart object layer: Most professional templates use smart objects in Photoshop. Double-click the smart object layer to open a separate editing window where you’ll place your design.
- Import your artwork: Paste or place your PNG file into the smart object window. Make sure the background is transparent so the garment fabric shows through.
- Scale and align the design: Resize your artwork to match the intended print area. Use guides or rulers to center the design horizontally. For chest prints, the standard placement is about 3 to 4 inches below the collar.
- Save the smart object: Once your design is positioned, save the smart object file. The main template will automatically update to show your design on the garment.
- Preview and adjust: Zoom out and review the full mockup. Check for alignment issues, color accuracy, and scale relative to the garment size.
- Export for your intended use: Save a high-res version for print review and a compressed version for web listings. Use JPEG for web and TIFF or PNG for print-ready files.
- Repeat for additional placements: Create separate mockup files for back prints, sleeve placements, and label areas.
Following print-on-demand placement guidelines is critical for consistency. Use your print provider’s own mockup tools to ensure your placement matches their production rules exactly. This eliminates surprises when the real garments come off the press.
| Method | Time per design | Accuracy | Best for |
|---|---|---|---|
| Manual (Photoshop) | 15 to 30 minutes | High | Custom, one-off designs |
| Online mockup tools | 5 to 10 minutes | Medium | Quick listings, social content |
| Automated/API batch | Under 1 minute per SKU | High (when set up correctly) | Large catalogs, multiple colorways |
Pro Tip: Always create mockups for at least two colorways, even if you plan to launch with one. Seeing your design on a light and dark garment often reveals contrast or readability issues you wouldn’t catch otherwise.
Explore POD mockup strategies and premium tee design options to understand how garment choice affects your mockup output.
Make your apparel mockups look real: Best practices
After you’ve run through the basics, it’s time to focus on elevating the quality and realism of your mockups. A flat, lifeless mockup won’t convince anyone to buy. Here’s how to make yours look like a real photograph.
Color accuracy comes first. Match your brand’s exact color values using hex codes or Pantone references. If your brand red is #C0392B, that value should be consistent across your artwork, your mockup, and your print files. Inconsistency here leads to customer complaints and returns.
Use fabric texture overlays. Layering a subtle fabric texture over your design makes it look like it’s actually printed on the garment rather than pasted on top. Most premium mockup templates include this, but you can add it manually using a multiply or overlay blend mode in Photoshop.
Apply displacement maps for curved surfaces. Sleeves, collars, and side seams are curved. A flat design placed over them looks unnatural. Displacement maps warp your design to follow the fabric’s contours, making it look like it belongs on the garment. This is one of the most effective techniques for realistic fabric effects.
Add natural shadows and highlights. Light falls on garments in specific ways depending on the fabric weight and fold. Adding subtle shadows around the edges of your design area and highlights at the center creates depth and dimension.
Key best practices at a glance:
- Match brand colors using exact hex or Pantone values
- Use multiply blend mode for texture overlays
- Apply displacement maps on curved garment areas
- Add soft drop shadows to lift the design off the fabric
- Test mockups in both light and dark environments
Warning: Overdoing warp effects or adding too many texture layers can make your mockup look artificial and over-processed. Buyers are good at spotting fake-looking product images, and a mockup that tries too hard can actually reduce trust. Keep effects subtle and grounded in how fabric actually behaves.
Matching brand colors and using lighting techniques are established best practices that include adding fabric textures and using perspective or warp techniques for curved surfaces like sleeves. And as noted in realistic mockup guides, over-warping or ignoring how fabric actually folds can make mockups feel fake. Good mockups respect folds and contours and rely on lighting and shadows to sell depth.
Pro Tip: Before finalizing any mockup, view it at the same size your customer will see it, whether that’s a 500px product thumbnail on a marketplace or a full-screen image on your website. What looks great at full resolution can fall apart at thumbnail size.
See how crop tee mockup tips apply these principles to more fitted garment styles.
Scaling up: Batch mockups and automation for multiple designs
If you’re growing or launching a full product line, scaling mockups efficiently becomes essential. Doing mockups one by one is fine for a small capsule drop, but when you’re managing 30 SKUs across 5 colorways, that’s 150 individual files. Manual creation at that scale is not realistic.
Here’s when batch mockups become necessary:
- Multiple SKUs with shared design elements: If the same logo appears on 10 different products, automation lets you apply it once and generate all 10 mockups simultaneously.
- Multiple colorways per design: Launching a tee in 6 colors means 6 mockups minimum. Batch tools handle this in seconds.
- Marketplace listings at scale: Platforms like Etsy or Amazon require multiple product images per listing. Batch generation keeps your listings consistent and professional without burning hours.
- Seasonal or campaign refreshes: When you update a design for a new season, batch tools let you regenerate all mockups with the new artwork instantly.
Setting up a batch workflow:
- Build a master Photoshop template with a clearly labeled smart object layer for your design placement.
- Prepare all artwork files in a single folder, named consistently (e.g., logo_black.png, logo_white.png).
- Use Photoshop’s batch action feature or a third-party API tool to loop through each artwork file and apply it to the template.
- Set your export settings once and let the automation handle the rest.
- Review a sample from each batch before approving the full set.
API-based automation tools can batch-generate mockups from smart object templates, enabling large-scale production of listing images for sellers managing many variations.
| Workflow | Setup time | Output speed | Best for |
|---|---|---|---|
| Manual one-by-one | None | Slow | 1 to 5 designs |
| Photoshop batch actions | 30 to 60 minutes | Fast | 10 to 50 designs |
| API-based automation | 2 to 4 hours | Very fast | 50 or more designs |
Pro Tip: Use a strict naming convention from day one. Something like ProductName_Color_Placement_v1.png keeps your asset library organized and makes future updates far less painful. Pair this with custom labeling strategies to ensure your physical product branding matches your digital mockups.
Troubleshooting apparel mockup issues
Even with best practices, problems may occur. Here’s how to catch and correct them early before they become production errors or lost sales.
Common issues and solutions:
- Blurry or pixelated design: Your source artwork is too low resolution. Always start at 300 DPI or higher. Upscaling a 72 DPI file does not add real detail.
- Colors look different on screen vs. print: You may be working in RGB mode for a print job. Convert to CMYK before sending files to your printer, and request a physical proof if possible.
- Design placement looks off in production: The mockup template may not match your printer’s actual print area. Always confirm print dimensions with your production partner before finalizing mockup placement.
- Transparent areas showing as white: Your PNG wasn’t exported with transparency enabled. Re-export from your design software with the “transparent background” option checked.
- Fabric texture overlay looks wrong: The blend mode may be incorrect. Try switching between multiply, overlay, and soft light to find what works with your specific template.
Low-resolution artwork and incorrect color profiles are among the most common causes of blurry or off-color mockups. The fix is straightforward: start with high-resolution files and use the correct export profiles for your intended output, whether that’s web or print.
Remember: A bad mockup doesn’t just waste your time. It can lead to a production error that costs real money, or worse, a customer-facing product that damages your brand reputation. Treat every mockup as the final quality check before production begins.
Pro Tip: Always preview your mockups using your actual print provider’s design tools, not just your own software. Providers like Tekton LA have specific print areas, bleed zones, and color calibration settings that your mockup should reflect. Check out silkscreen printing tips to understand how different print methods affect placement requirements.
Our hard-won lessons: What actually makes apparel mockups sell
Now that you’re equipped with both fundamentals and common pitfalls, here’s the inside story of making mockups that convert, not just look good.
Here’s something most mockup guides won’t tell you: a technically perfect mockup can still fail to sell your product. Realism is necessary, but it’s not sufficient. What actually drives a customer to click “add to cart” is context and story.
A mockup showing your tee on a plain white background tells the customer what the product looks like. A mockup showing that same tee worn by someone in a coffee shop or a skate park tells them who it’s for and how it fits into a life. That emotional context is what converts browsers into buyers. We’ve seen brands with average mockup quality outsell brands with technically superior mockups simply because their images told a better story.
Color accuracy is another area where brands consistently underinvest. We’ve worked with brand owners who approved mockups on uncalibrated laptop screens, only to be surprised when the physical product looked different. The fix is simple but often skipped: calibrate your display, use a physical color swatch for reference, and always request a test print before committing to a full run. Lessons from premium tee designs show that brands that invest in color accuracy at the mockup stage have significantly fewer production revisions.
The most underused strategy we’ve seen is audience testing before launch. Show your mockup to 10 real potential customers, not friends and family, before you finalize anything. Ask them what they think the brand is about, who they think wears it, and whether they’d buy it. Their answers will tell you more than any design software can. Small adjustments to layout, scale, or context based on real feedback can dramatically improve your conversion rate before you spend a dollar on production.
Ready to launch your custom apparel designs?
A strong mockup is your bridge between a great idea and a successful product launch. When your visuals are accurate, professional, and compelling, you walk into production with confidence and your customers walk away with exactly what they expected.
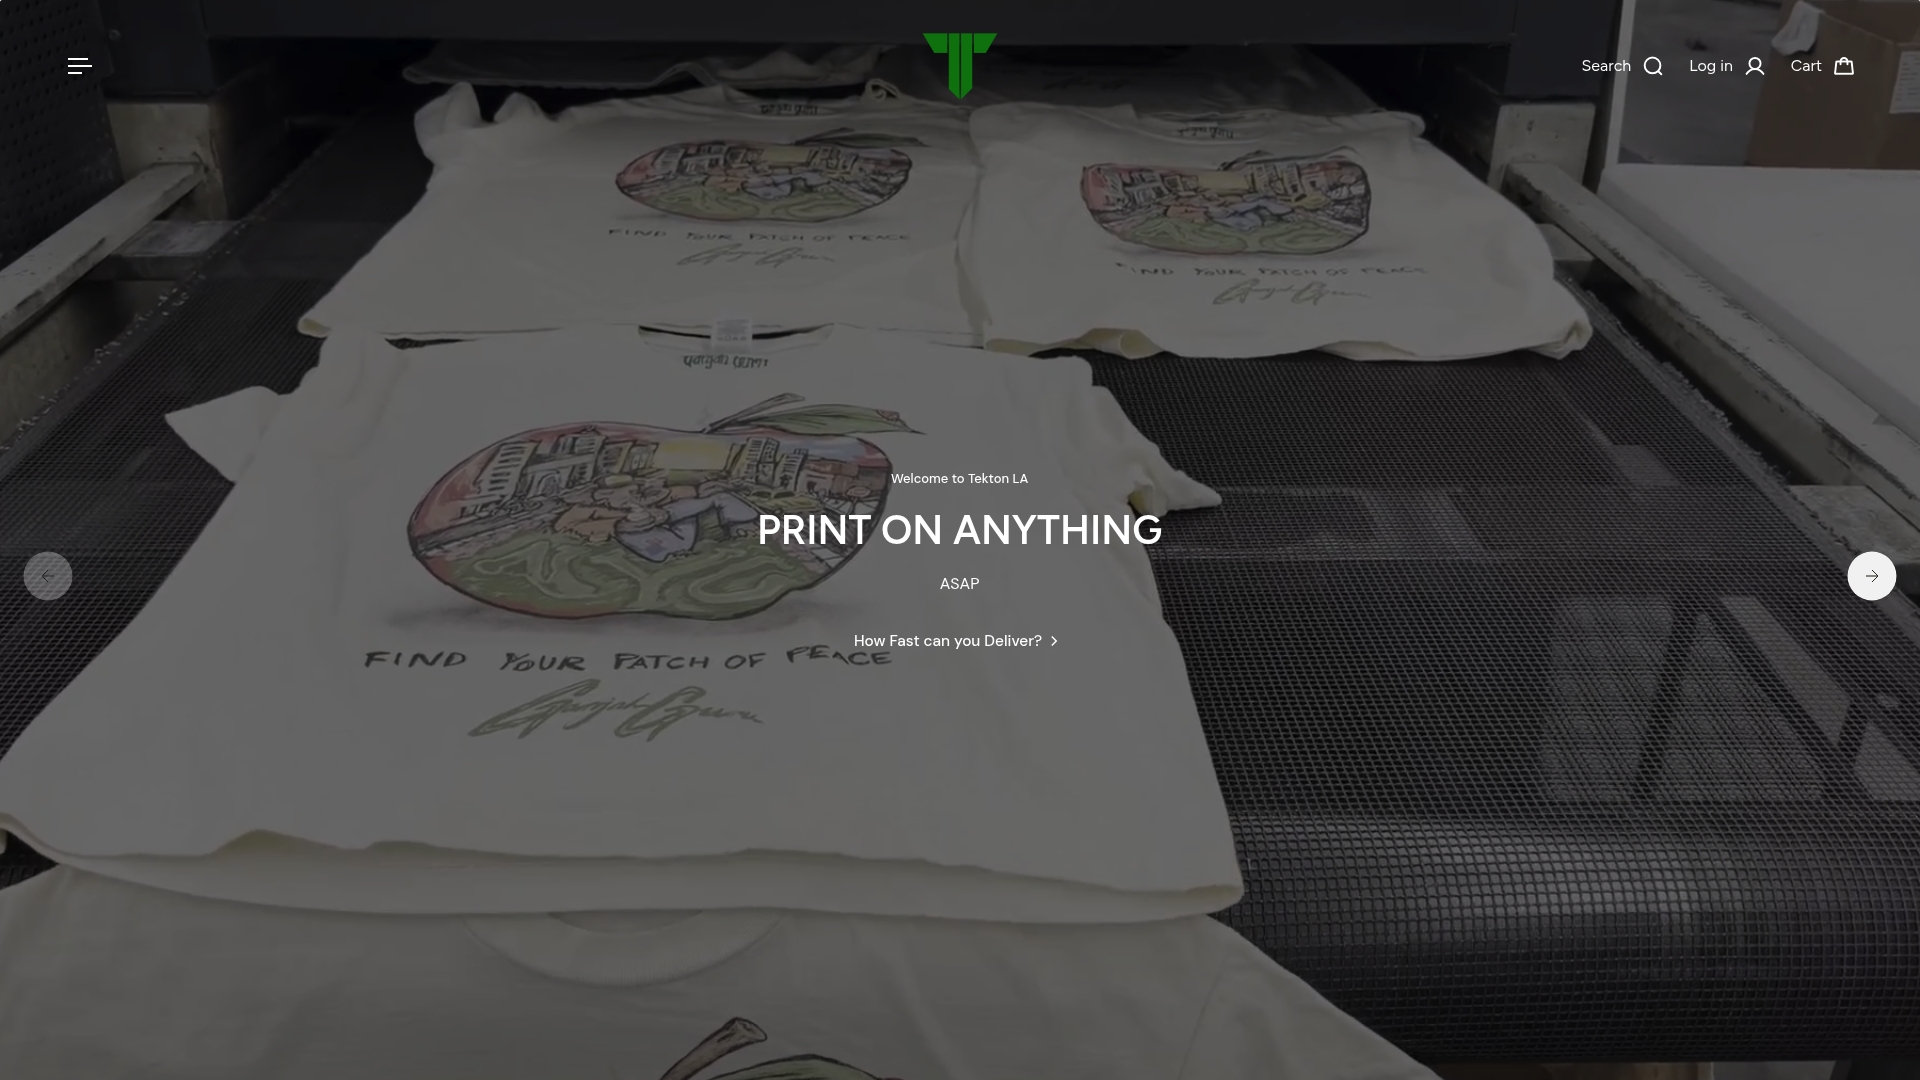
At Tekton LA, we help brands close the gap between mockup and finished product. Whether you’re launching a single design or a full seasonal collection, our team in Downtown Los Angeles is ready to bring your visuals to life with precision. From the Garment Dye Long Sleeve to fully branded Custom Woven Labels, every detail is handled in-house for quality you can count on. Browse Tekton LA’s full custom apparel collection and take the next step from mockup to market.
Frequently asked questions
What file format works best for apparel mockups?
PNG is preferred because of its transparency support, but a high-res JPG is also acceptable for most mockup templates when transparency isn’t needed.
How do I make my mockup colors match my physical products?
Match your exact brand color values, use a calibrated display, and verify with test prints. Established best practices include using fabric textures and lighting to reinforce color accuracy across mockup variations.
Can I preview different placements like sleeves or labels?
Yes. Most mockup tools support multiple placements, and print-on-demand platforms provide real previews for front, back, sleeves, and labels to match production rules.
How can I avoid mockups that look blurry or pixelated?
Always start with high-resolution source files and export at the correct size and DPI for your intended use, whether that’s web or print.
Is it possible to automate apparel mockup creation for large product catalogs?
Yes. API and smart object workflows allow you to batch-generate mockups at scale, making large catalog management fast and consistent.