

Understanding the role of DPI garment printing is one of those topics where most designers think they already know enough, and that assumption costs them. Blurry prints, pixelated logos, and rejected artwork files trace back to a single misunderstanding: that DPI is a setting you fix after the fact. It is not. This guide breaks down what DPI actually controls, how it interacts with pixel dimensions and file preparation, and what benchmarks matter most when you are producing custom apparel that needs to look sharp at close range.
Table of Contents
- Key Takeaways
- The role of DPI garment printing, explained
- Industry standards and benchmarks for garment prints
- Why DPI alone does not guarantee quality
- High-DPI printing and where the industry is headed
- Artwork preparation checklist for your team
- My take on what designers actually get wrong
- Get high-DPI custom apparel from Tektonla
- FAQ
Key Takeaways
| Point | Details |
|---|---|
| DPI is about output, not source quality | Actual print sharpness depends on pixel dimensions, not the DPI metadata tag alone. |
| 300 DPI is the professional standard | A 12x16 inch front print requires 3600x4800 pixels at 300 DPI to reproduce fine detail correctly. |
| Provider specs vary by product | Printify requires 300 DPI for all uploads; Printful accepts 150 DPI for low-detail items but mandates 300 DPI for fine prints. |
| DTF has extra file requirements | PNG with transparent background and minimum 0.2 mm line thickness are mandatory alongside correct DPI for DTF printing. |
| Vector files bypass DPI limits | Vector graphics scale without quality loss, making them the safest choice for logos and type-heavy artwork. |
The role of DPI garment printing, explained
DPI stands for dots per inch. It describes how many individual ink dots a printer places within one inch of output. More dots per inch means finer detail and smoother gradients on the finished garment. That is the printer’s job. What you supply as a designer is a separate question entirely.
PPI, or pixels per inch, is the digital equivalent. It describes the density of pixels in your image file. The two are connected but not the same thing. When you export a file at 300 DPI for print, you are telling the printer: “Map 300 pixels across every inch of this output.” The critical part is that image sharpness depends on pixel density, not the DPI tag sitting in your file’s metadata.
Here is where most designers go wrong. They take a small, low-resolution image, open it in Photoshop, change the DPI from 72 to 300, and assume the problem is solved. It is not. No new pixels were created. The image is the same. The printer now has fewer dots to work with per inch, and the output will look worse, not better.
What actually matters for a sharp print:
- Pixel dimensions: The total number of pixels across the width and height of your artwork file
- Print size: The physical dimensions of the printed area on the garment
- DPI mapping: Whether your pixel dimensions divide cleanly into your print size at the target DPI
Pro Tip: Open your artwork file in Photoshop and check Image > Image Size. Make sure “Resample” is turned off when you adjust DPI so the software shows you the correct physical print size your existing pixels can support without degradation.
Understanding this at a foundational level changes how you think about garment printing techniques entirely. DPI is a production output spec. Pixel dimensions are your creative responsibility.
Industry standards and benchmarks for garment prints
Once you understand what DPI actually measures, the next question is: what numbers should you be working to? The answer depends on where the print goes, how the garment will be viewed, and which technology you are using.
300 DPI produces sharp text and smooth gradients at a close-viewing distance of roughly 12 inches, which is exactly how people read a shirt. This makes 300 DPI the baseline professional standard across DTG and DTF printing.
Here is how that translates to real pixel dimensions:
- Decide your print area dimensions in inches. A standard front chest print is typically 12x16 inches.
- Multiply width by 300: 12 x 300 = 3,600 pixels wide.
- Multiply height by 300: 16 x 300 = 4,800 pixels tall.
- Export your file at exactly 3,600 x 4,800 pixels at 300 DPI.
- Confirm the export settings match the provider’s required pixel specs before uploading.
Not all print locations use the same dimensions. A left chest pocket print runs around 4x4 inches, which requires only 1,200 x 1,200 pixels at 300 DPI. Sleeve prints, back prints, and yoke prints each have their own standard sizes. Checking these before you design saves significant rework.
Provider requirements also vary. Printify requires 300 DPI for PNG and JPEG uploads, while Printful’s DTG products accept a 150 to 300 DPI range, with 300 DPI mandatory for any design containing fine lines or detailed gradients.
| Print location | Typical size | Minimum pixels at 300 DPI |
|---|---|---|
| Full front | 12 x 16 in | 3,600 x 4,800 px |
| Left chest | 4 x 4 in | 1,200 x 1,200 px |
| Full back | 12 x 16 in | 3,600 x 4,800 px |
| Sleeve band | 14 x 3 in | 4,200 x 900 px |
For DTF specifically, the file format requirement goes beyond DPI. Artwork for DTF must be PNG or TIFF with a transparent background, printed at 300 DPI at the actual intended size. The transparency layer determines where white underbase ink is placed, which directly affects how colors appear on dark garments. Missing this detail produces muddy colors and adhesion problems, regardless of how well the DPI is set.
Why DPI alone does not guarantee quality
Knowing the right DPI number is a starting point. Getting a great print requires understanding what else affects the output, because DPI alone will not save artwork that is fundamentally underprepared.
The most common mistake designers make is assuming that changing the DPI tag without adding pixels improves the result. It does not. Pixel count is the actual source of detail. If your artwork was created at 800 x 800 pixels and you need to print it at 10 inches wide, you have 80 pixels per inch to work with, and that will look soft regardless of what the DPI metadata says.
A few more factors that control final print quality:
- Vector vs. raster: Vector graphics scale independently of DPI, making them ideal for logos, typography, and geometric art. Raster files are pixel-dependent and must meet pixel dimension requirements precisely.
- Line thickness: DTF printing requires a minimum line thickness of approximately 0.2 mm. Lines thinner than this can disappear or bleed on fabric, particularly after washing.
- Text handling: Convert all text to outlines before exporting. Live text can render differently depending on the printer’s software and font availability.
- Transparent backgrounds: For DTF, a white or opaque background prevents the white ink underbase from printing correctly, creating color shifts on dark garments.
Pro Tip: If your original artwork is too small for the required print dimensions, use an AI upscaling tool before submission. AI upscaling can reconstruct detail up to 4x the original size, often giving you enough pixel density to meet 300 DPI requirements without noticeable degradation.
The format you save in also carries weight. PNG is the preferred format for DTG and DTF because it preserves transparency and uses lossless compression. JPEG removes transparency and introduces artifacts at high compression ratios, which show up in large flat color areas and fine gradients. If your artwork contains a transparent background, a JPEG file will replace it with white, which breaks the entire DTF workflow.
High-DPI printing and where the industry is headed
The 300 DPI standard has been reliable for years, but hardware is catching up to demand for finer detail. New DTG printers now support up to 600 DPI for fine line art, which opens up options for intricate branding, photographic prints, and textured surface effects that were difficult to reproduce cleanly at 300 DPI.
| Print resolution | Best use case | Viewing distance impact |
|---|---|---|
| 150 DPI | Simple logos, bold text | Works at arm’s length |
| 300 DPI | Standard fashion prints, photos | Sharp at 12 inches |
| 400 DPI | Fine line art, detailed logos | Noticeable improvement up close |
| 600 DPI | Photographic detail, texture effects | Diminishing returns beyond 18 inches |
The honest reality is that returns diminish above 300 DPI at typical garment viewing distances. A person standing three feet away cannot distinguish a 300 DPI print from a 600 DPI print. Where higher DPI makes a genuine difference is in prints that will be scrutinized up close: small-scale typography, fine illustrative detail, or photographic work where tonal transitions need to feel smooth rather than stepped.
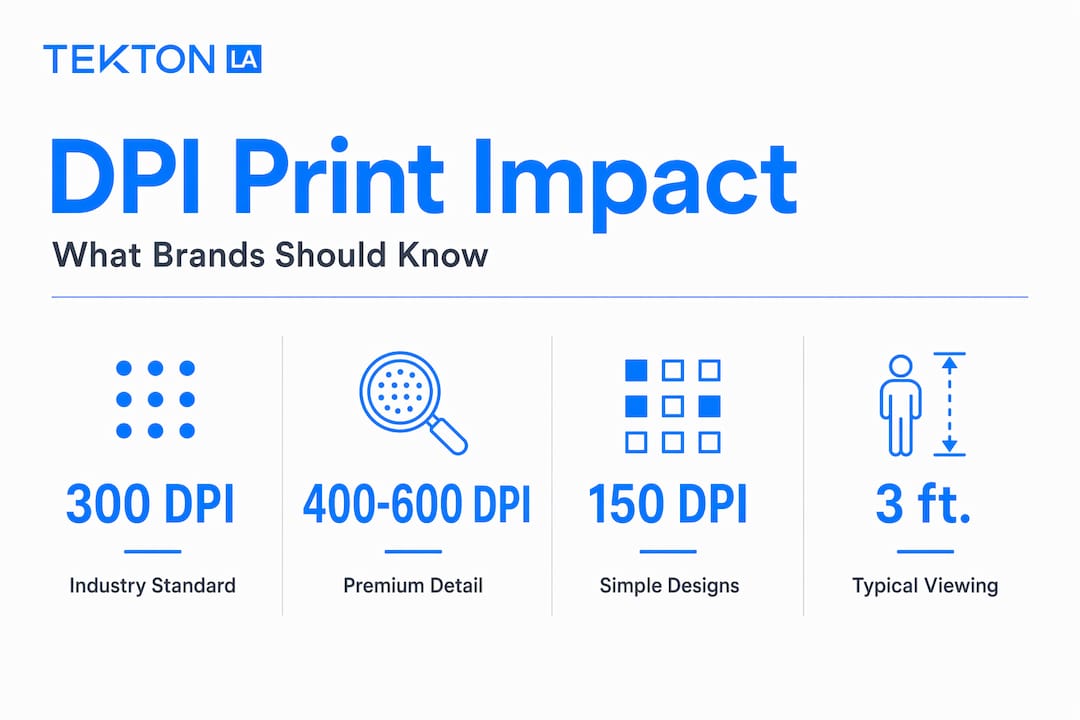
For fashion brands specifically, the case for 400 to 600 DPI printing is strongest when the garment itself is a premium product. If you are selling a $120 graphic tee with hand-illustrated artwork, the investment in higher DPI output is consistent with the price point and the expectation of the buyer. If you are producing event merchandise at volume, 300 DPI is entirely sufficient and keeps file sizes manageable.
Balancing file size matters too. A 600 DPI file for a full front print can run 200 MB or more. That slows upload times, increases storage requirements, and can cause issues with some provider platforms. Unless the design specifically benefits from it, 300 DPI remains the most practical standard for most apparel work.
Artwork preparation checklist for your team
Knowing the theory is useful. Having a repeatable process that your team follows before every print order is what actually prevents quality problems.
- Define your print area first. Get the exact dimensions from your printer or provider before you open a design file. Building artwork to the wrong size means rebuilding it.
- Calculate pixel dimensions. Multiply print width in inches by 300 for the required pixel width, and repeat for height. This is your canvas size.
- Set up your design file correctly from the start. Work in the exact pixel dimensions at 300 DPI. Do not scale up at the end.
- Use vector for logos and type. Export vector elements at the required pixel dimensions rather than placing low-resolution raster versions of them.
- Check transparency. If you are printing DTF, confirm the background is transparent and not just white. Use a checkerboard view in your software to verify.
- Convert text to outlines. Do this as the last step before export to preserve your ability to edit.
- Export in the correct format. PNG for transparency-dependent work, TIFF for archival quality, JPEG only when the provider explicitly accepts it and transparency is not needed.
Confirming provider pixel and DPI specs before you export prevents the most common source of late-stage production errors. Most platforms display these requirements in the upload workflow, but checking in advance means your file is built right the first time.
Pro Tip: Create a template file for each print location you use regularly, pre-sized at the correct pixel dimensions and 300 DPI. Share it across your team so nobody starts from scratch and every submission starts at the right spec.
For a deeper look at how DTG specifically handles file requirements, the DTG startup guide at Tektonla covers the technical side in practical terms for clothing brands.
My take on what designers actually get wrong
I have worked on enough print projects to tell you that the DPI conversation almost always starts too late. Teams finalize a design, love how it looks on screen, and then send it to the printer expecting the same result on fabric. When the print comes back soft or pixelated, the instinct is to blame the printer. Usually, the problem was in the file.
What I have found is that most designers understand DPI in theory but skip the pixel dimension calculation in practice. They assume a high-quality source image is automatically print-ready. It often is not. A 1500 x 1500 pixel logo looks great on Instagram. Print it at 10 inches wide and you have 150 DPI, which will look noticeably soft on a shirt.
The designers who avoid these problems consistently do one thing differently: they verify the numbers before they design, not after. They know their print area, they set up the canvas at the correct pixel dimensions, and they never scale artwork up without checking whether the resolution holds.
I also think the industry undervalues the collaboration between design teams and print providers. A good provider reviews artwork before printing and flags resolution issues. The custom printing options at Tektonla are built around that kind of pre-production review, and it saves clients real money. Treating your print provider as a technical partner rather than just a vendor changes the quality of what comes out.
Embrace the higher DPI standards that newer hardware makes possible. Do not see them as a burden or as creating more file management work. See them as an opportunity to print details that your competitors are not getting right yet.
— Christian
Get high-DPI custom apparel from Tektonla

Tektonla’s Downtown Los Angeles production team works with fashion brands, startups, and marketing teams that cannot afford to reprint because the artwork was not prepared correctly. Every order goes through a pre-production file review that checks DPI, pixel dimensions, format specs, and transparency requirements before a single shirt goes on the press. Whether you are printing a full front graphic or a fine-detail left chest logo, the team builds to the right spec the first time.
Explore the Printers Shirt collection for premium DTG-ready blanks built for high-resolution output, or take a look at the Garment Dye Shirt options if you want richly colored base garments that make DPI-optimized artwork pop. No minimum order quantities. Fast turnaround. All production local to Los Angeles.
FAQ
What is DPI in garment printing?
DPI stands for dots per inch and refers to how many ink dots a printer places per inch of output. In garment printing, higher DPI produces finer detail and smoother color gradients on the fabric.
What DPI should I use for T-shirt printing?
300 DPI at the actual print size is the professional standard for garment printing. For a 12x16 inch front print, that means your artwork file needs to be at least 3,600 x 4,800 pixels.
Does changing DPI in Photoshop improve print quality?
No. Changing the DPI metadata without resampling does not add pixels to your file. Print sharpness depends on actual pixel dimensions, so the only way to improve quality is to work with a higher-resolution source file or use AI upscaling.
What file format is best for DTF garment printing?
PNG with a transparent background is the required format for DTF printing. The transparency layer tells the printer where to apply white underbase ink, which is critical for correct color reproduction on dark garments.
When does printing above 300 DPI make a difference?
Printing at 400 to 600 DPI is worth considering for fine illustrative detail, small typography, or photographic artwork that will be viewed up close. At typical garment viewing distances beyond 18 inches, the difference between 300 DPI and 600 DPI is negligible.