

Choose direct embroidery for staff uniforms, permanent chest logos, and small refined marks that need to look sewn-in and stay put for years. Choose patches when you need a badge look across multiple product types, easy replacement, or decoration on items too bulky or curved to hoop. Two edge cases flip the default: extremely fine-detail logos often print or weave cleaner as a patch, and heat-sensitive fabrics like some technical shells rule out iron-on patches entirely.
TL;DR:
- Embroidery is ideal for long-lasting, subtle logos on staff uniforms, especially on thicker fabrics, but can be costly for small or quick-turn projects.
- Patches offer greater flexibility for product types like caps and bags, with easier replacement and inventory management for seasonal branding or sponsorships.
- Fine detail logos on lightweight or curved items typically perform better as patches, since embroidery may blur or pucker under tension.
- Patch costs include tooling, production, and attachment labor, but support lower minimums and stockpiling, reducing rework and rebranding expenses.
- Iron-on patches are quick and affordable but less durable, with around 50 washes, while sewn embroidery generally outlasts patches through repeated laundering.
Table of Contents
- Quick Checklist: Patches vs Embroidery by Job
- How Pricing Works: Setup, Per-Piece Cost, and Scale
- How Each Method Reads on Your Brand
- Attachment Options and Fabric Compatibility
- Longevity and Care: What Actually Fails First
- Lead Times, Minimums, and Inventory Strategy
- How to Choose: Decision Checklist and Supplier Brief
- Tekton LA Practice Notes: What We See in Production
- Comfort and Wearability: The Trade-Off Nobody Mentions
- Environmental Considerations: Materials and Waste
- Common Use Cases by Industry
- Trends and Innovations Worth Watching
- A Straight Answer From Someone Who’s Seen Both Fail
- Get a Sample Before You Commit to Either Method
- Sources
Quick Checklist: Patches vs Embroidery by Job
The right call usually comes down to what the item is, how long it needs to last, and whether you’ll ever need to swap the logo out. Here’s how that breaks down by common job:
- Staff uniforms (permanent, subtle signal): go with direct embroidery. It sits flat against the fabric and reads as part of the garment, not something bolted on. Check fabric weight first. Thin polos need lighter stitch density than heavy canvas jackets.
- Event swag and merch (flexible, needs to be replaceable): patches win. You can stock a batch of patches and apply them across hoodies, tote bags, and caps as inventory allows, and swap a sponsor logo season to season without re-embroidering everything.
- Hard-to-hoop items (bags, curved caps, bulky trim): patches are more practical almost every time. Embroidery machines need flat, stable fabric under tension. Anything with seams, padding, or curvature fights that setup.
- High-detail logos on thin garments: woven or printed patches often outperform dense embroidery here. Tight text and fine linework can blur or pucker when stitched directly into lightweight fabric.
How Pricing Works: Setup, Per-Piece Cost, and Scale
Embroidery’s biggest upfront cost is digitizing: converting your artwork into a stitch file the machine can run. That’s typically a one-time fee per design, and it stays useful indefinitely once it’s dialed in. Patches carry their own setup cost in tooling and initial production, but because the patch itself becomes a physical asset, you’re not re-digitizing every time you add a new product to the run.
Per-piece math flips depending on volume. Small orders on unfamiliar garments favor embroidery, since you’re paying for one setup and applying it directly. Larger runs across mixed products often favor patches, because holding patches as inventory decouples patch production from garment production entirely. You order patches once, then apply them as garments come in.
The hidden costs people miss:
- Attachment labor for sew-on patches, especially at volume
- Replacement costs when a design changes mid-season
- Adhesive failure on iron-on patches applied to the wrong fabric
- Sample and wash testing, which both methods require before a full production run
Patches functioning as a stockable asset is genuinely one of the more underrated cost advantages small brands overlook. It reduces rework when a garment run gets delayed or reordered.
How Each Method Reads on Your Brand
Direct embroidery gives you an integrated look. The logo becomes part of the garment’s surface, which tends to read as premium or heritage, especially on basics like polos and fleece. This is why decoration choice should follow garment mood: a clean stitched-in mark often looks more expensive than a built-up patch on a soft, minimal piece.
Patches read as a badge. That’s not a downside. It’s a different signal entirely, and it’s the right one for team crests, sponsor placements, or anything meant to look official and modular.
Stitch density, color count, and small text all behave differently across the two. Fine embroidery detail can blur on loose-weave fabric, while woven patches hold crisp small text better than direct stitching does. When picking a patch finish, consider:
- Merrowed edge: classic rounded border, most durable for high-wear items like backpacks
- Laser cut: clean edge for complex shapes, no visible border
- 3D embroidery (puff): raised texture that adds dimension, popular on caps
Attachment Options and Fabric Compatibility
Getting the attachment method wrong is the most common way a good design ends up looking cheap. Here’s how the main options stack up:
- Sew-on patches are the most durable option and work on almost any fabric, but they require labor per piece and aren’t practical for large on-site events.
- Iron-on and heat-press patches apply fast and cheap, but iron-on backing doesn’t work on PVC or some chenille patches, and heat-sensitive synthetics can scorch or warp under a press.
- Hook-and-loop (Velcro) is the only real option for garments that need frequent swapping, like tactical or team gear with rotating name tapes.
Direct embroidery has its own constraint: the garment has to hoop cleanly. Anything with heavy padding, odd seams, or a curved surface fights the machine, which is exactly why patches exist as a workaround for those items.
Pro Tip: If you’re applying patches on-site at an event, budget extra time per unit for heat-press setup and cooldown. Rushing the press is the number one cause of edge lift within the first few washes.
Longevity and Care: What Actually Fails First
Sewn embroidery generally outlasts iron-on patches through repeated washing and drying, since there’s no adhesive layer to break down over time. Iron-on patches typically hold up for around 50 washes depending on fabric type and how well they were pressed initially, after which edge lift becomes common.
Most failure comes down to two things: wrong backing for the fabric, and under-pressing at application. Correct backing choice and adequate heat and pressure during application reduce puckering and edge lift substantially.
For care instructions, tell staff or customers to:
- Turn the garment inside out before washing
- Use low heat or air dry rather than high-heat tumble drying
- Avoid ironing directly over a patch without a protective cloth
Garments that get heavy wear and frequent washing, like team uniforms, deserve sew-on attachment even if it costs more upfront. If you’re building decorated pieces meant to last for years rather than a season, the long-term preservation habits collectors use for tour merchandise translate directly to branded apparel care.
Lead Times, Minimums, and Inventory Strategy
Sample turnaround matters more than people plan for. Both methods need a mockup and, ideally, a stitched or pressed sample before a full run, and skipping that step is how brands end up with 500 units of a logo that puckers.
- Mockup and sample timelines: budget a few extra days on either method for a proper wash-tested sample before committing to full production.
- Minimums: patches often support lower minimums than a full embroidery setup once the tooling is done, since reusable patch production doesn’t require per-garment hooping.
- Stocking strategy: order patches ahead in bulk, then apply them as garments arrive or as sizes sell through. This supports staged rollouts and late personalization without reordering the whole batch.
How to Choose: Decision Checklist and Supplier Brief
Run through this before placing an order:
- Fabric test: does the material accept heat, or does it need sew-on or hook-and-loop?
- Placement test: can the spot be hooped flat, or does it need a patch to work around curves and seams?
- Quantity and budget: is this a one-time small run or an ongoing multi-product line?
- Replacement plan: will this logo change next season, or is it permanent?
- Brand signal: do you want an integrated premium look or a badge aesthetic?
When briefing a supplier, hand over the vector file format they request, a clear color match (Pantone if you have it), and your fabric type upfront. Ask specifically about sample approval and wash testing before full production, plus backing options and attachment method for your specific garment.
Pro Tip: Reject any sample that shows puckering, thread breaks, or uneven edges before it’s washed. If it looks rough on day one, it fails faster after five washes.
Tekton LA Practice Notes: What We See in Production
Tekton LA runs sample approval and wash testing on every branding job before full production, on the actual garment base, not a generic swatch. That step catches puckering and adhesive issues before they hit hundreds of units. We lean on locally sourced materials and eco-conscious backing options where possible, and we’ve applied both direct embroidery and patch production across client runs ranging from single-location staff uniforms to multi-city event merch.
Comfort and Wearability: The Trade-Off Nobody Mentions
Direct embroidery adds thread and a stabilizer backing to the exact spot it’s stitched, which slightly stiffens that area of fabric. On thin cotton tees, dense stitching can create a noticeable stiff patch against the skin, especially on inside-facing placements like collars or waistbands.
Patches add more bulk. A merrowed-edge patch has thickness and a firm border that sits proud of the garment, which some wearers notice more on tight-fitting apparel or anywhere that rubs against skin, like underarms or inner sleeves.
For high-wear athletic apparel, lighter stitch density and smaller patch sizes both help. If comfort matters more than visual impact, for something like a fitness studio’s lightweight tee, a smaller, lower-density embroidered mark generally beats a larger patch. For outerwear and structured pieces like jackets and caps, the added stiffness or bulk barely registers, since the base fabric is already sturdier.
Placement matters as much as method here. A logo on a chest panel of a structured jacket causes zero wearability issues. The same patch on the inside neck of a soft t-shirt will bother almost every wearer within a day.
Environmental Considerations: Materials and Waste
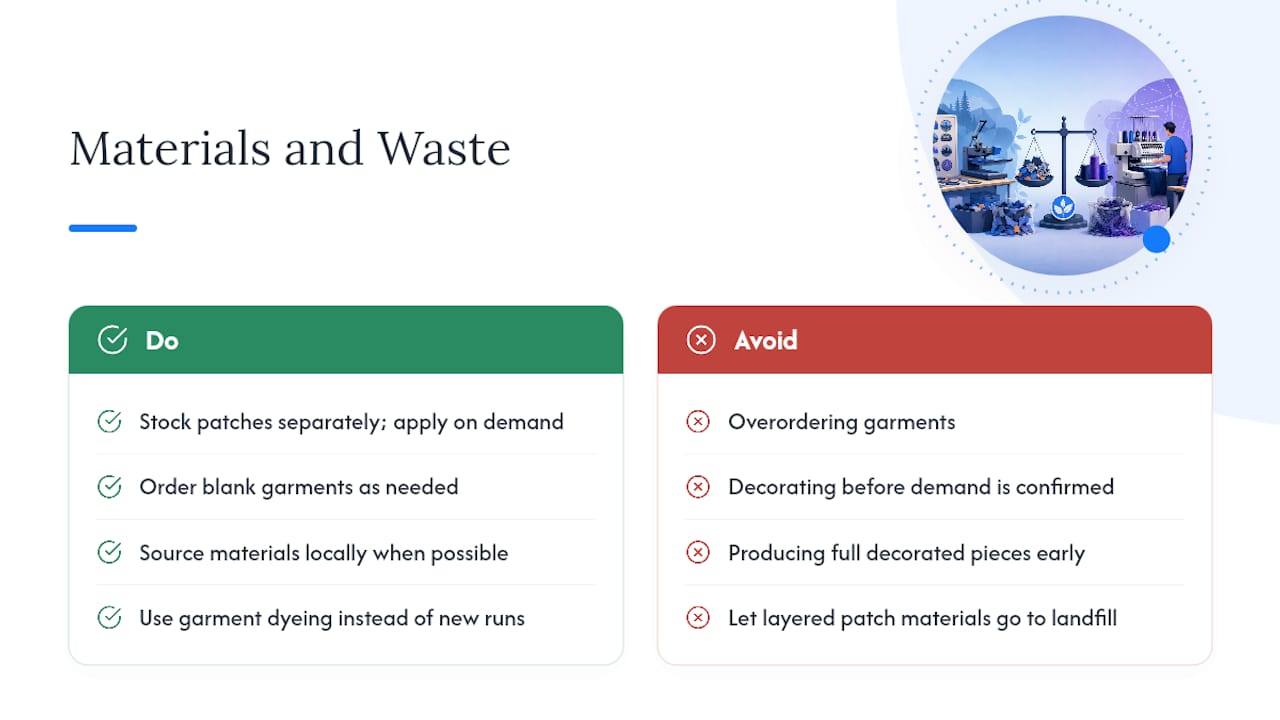
Both methods carry a materials footprint worth thinking through, and neither is automatically the greener choice. Embroidery thread is typically polyester or rayon, run through a machine with minimal waste beyond thread trims. Patches involve more material layers: a base fabric, a backing (often a fusible adhesive or twill), and sometimes a plastic or vinyl border, all of which add up in a landfill if garments get discarded rather than passed on.
The bigger environmental lever is usually production planning, not the decoration method itself. Overordering garments you never use wastes more resources than either embroidery or patches ever will. This is where patches actually help: since they can be stocked separately from garments, you avoid overproducing full decorated pieces before demand is confirmed. You order blank garments as needed and apply patches on demand instead of guessing sizes and quantities months ahead.
Tekton LA sources materials locally where possible and offers garment dyeing as an alternative to producing new fabric runs, which cuts down on the transportation and dye-waste footprint tied to conventional garment production. For brands weighing sustainability seriously, the smarter question isn’t “patch or embroidery,” it’s “how much am I ordering before I know I need it.”
Common Use Cases by Industry
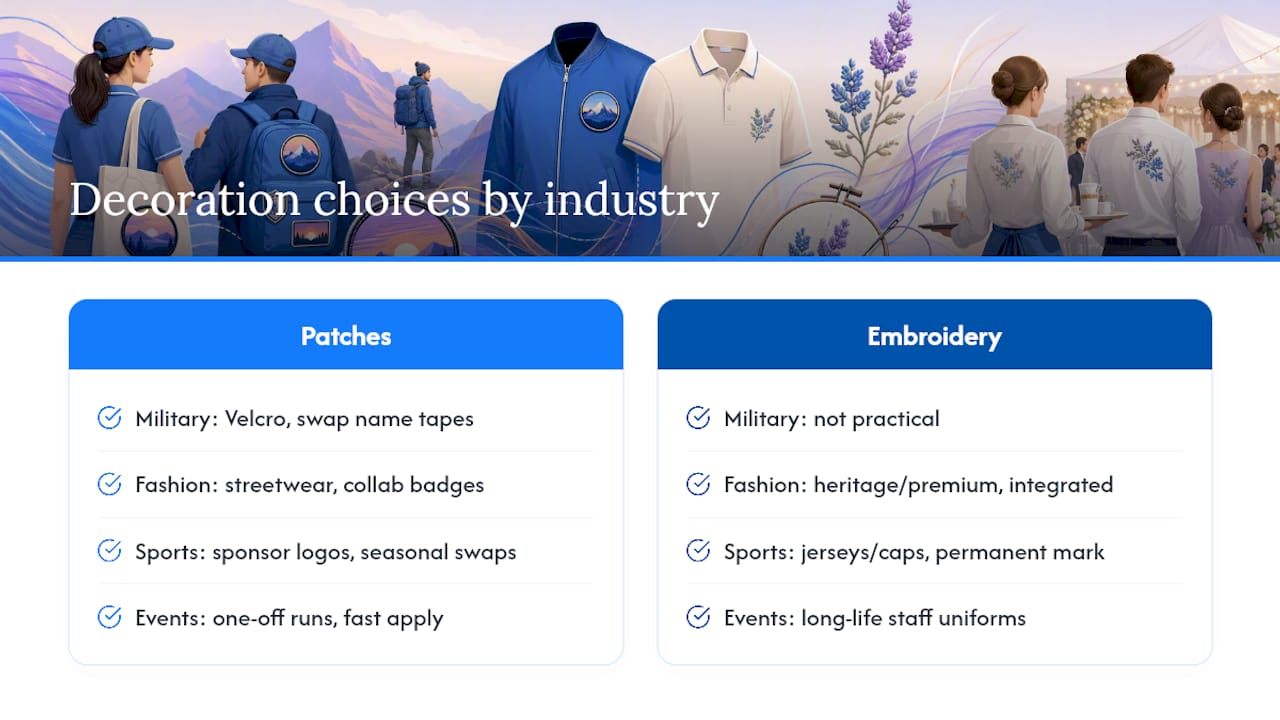
Military and tactical apparel almost always uses patches, and usually with hook-and-loop backing specifically. Units need to swap name tapes, rank insignia, and unit patches without resewing gear, which makes Velcro the only practical option in that world.
Fashion brands split depending on positioning. Heritage and premium labels lean toward direct embroidery on basics because it reads integrated and subtle. Streetwear and collab-driven labels lean toward patches, since a badge aesthetic fits the culture and patches make limited-run collabs easier to produce fast.
Sports teams use both, but for different reasons. Jerseys and fitted caps often get direct embroidery for a clean, permanent team mark. Sponsor logos on jackets or bags, especially ones that change season to season, tend to be patches, since swapping a sponsor patch is far simpler than re-embroidering an entire inventory of jackets.
Corporate and event branding usually comes down to lifespan. A staff uniform meant to last multiple years favors embroidery. A one-off conference or festival run, where the logo might never appear again, favors patches you can produce fast and apply across whatever merch you’re handing out.
Trends and Innovations Worth Watching
3D puff embroidery has moved from streetwear into mainstream corporate merch over the past few seasons, giving flat garments a raised, textured logo without switching to a full patch. Laser-cut patch edges have also become more common, letting brands run complex shapes without the visible merrowed border that used to be the default.
On the production side, digitizing software has gotten faster at converting complex artwork into clean stitch files, cutting turnaround time on custom designs. Hybrid patches that combine woven detail with a printed section are also gaining ground, letting brands get photo-realistic color in spots where woven thread alone couldn’t reproduce it. None of this changes the core decision between patches and embroidery. It just gives you more finish options once you’ve made that call.
A Straight Answer From Someone Who’s Seen Both Fail
Most guides treat this as a style choice. It’s really an inventory and replacement decision disguised as one. If your brand signal depends on permanence, chest logos on staff shirts, heritage basics, pay for the embroidery setup and don’t cut corners on digitizing. If you need flexibility across products or seasons, patches are the smarter default even when they cost more per unit upfront. Tekton LA applies this exact logic on client jobs, and we’ll run a sample before you commit to either.
— Christian
Get a Sample Before You Commit to Either Method
Tekton LA runs both direct embroidery and full patch production in-house, along with on-site application for event rollouts and private label options for brands that need woven labels alongside their patches or embroidery. That means you’re not choosing a vendor for one method and hunting for a second supplier when your project needs the other.

To get a quote, send over your logo as a vector file, your target garment or product type, and your expected quantity. We’ll flag fabric compatibility issues before production, not after you’ve paid for a run that puckers or won’t hold adhesive. If you want to see the finish in hand first, ask about a sample on one of our printers shirt blanks or browse the full Tekton LA service list to start a quote for your next branding run.
Sources
- Direct Embroidery vs Embroidered Patch for Premium Basics - StitchQuote
- Direct Embroidery vs Embroidered Patches: 7 Proven Advantages - Bushi Sports
- Custom Iron-On Patches | Low 5-Piece Min, Mockup in 12-24h - Panda Patches
- 10 reasons personalized iron-on patches are a must-have - Lopotech